
Installing Body Mounted Kadee Couplers
If you did as I did, you started collecting Large Scale equipment based on whether they appealed to you or not. A familiar railroad, a favorite industry (beer cars come to mind), an association with a time or place. One thing I did not consider was whether any two of them would actually couple together reliably.
Thus, after a few months or years, I had quite a collection of freight cars that wouldn’t couple (or stay coupled) together. The result was frustration, and the need to find some way of getting them all to couple together. While I now advise people to stick with a single manufacturer in the interest of simplicity, there was no one to tell me that when I started out.
My solution was one from my N-scale days: Kadee couplers. Now all of my passenger cars have Kadee No. 1 couplers on them, and most of my freight cars have at least one Kadee No. 1 coupler. As time and money permit, I’ll finish them with the second Kadee.
The easiest cars to do are passenger cars and box, refrigerator, gondola and flat cars. Hopper and tank cars have open ends, and there’s more “figgerin’” needed. After a few box cars, you can be ready to tackle one of them.
Why No. 1’s and not G scale? The G’s are a little more forgiving of bad track, but they are just too big for my taste. You may like them, that’s OK. These instructions work for either. Actually, they work for Kadees in any scale!
 1. Get your tools together. You don’t need
expensive or power tools. You’ve probably got most of them
already: a pair of tweezers, pin vise and drill bits, Exacto
knife with sharp blades, rubber bands, sprue cutter, clamps,
small screw driver, file(s) for plastic, and a small
wrench. The only thing you may not have is the Kadee
coupler height gauge. Its got a lot of other uses, so it’s
worthwhile whether you ever install a coupler or not. The
height gauge establishes the height of the coupler above top of
rail. Since there are a myriad of scales in Large Scale,
your height gauge will establish the same height above rail for
all pieces of equipment.
1. Get your tools together. You don’t need
expensive or power tools. You’ve probably got most of them
already: a pair of tweezers, pin vise and drill bits, Exacto
knife with sharp blades, rubber bands, sprue cutter, clamps,
small screw driver, file(s) for plastic, and a small
wrench. The only thing you may not have is the Kadee
coupler height gauge. Its got a lot of other uses, so it’s
worthwhile whether you ever install a coupler or not. The
height gauge establishes the height of the coupler above top of
rail. Since there are a myriad of scales in Large Scale,
your height gauge will establish the same height above rail for
all pieces of equipment.
 2. Look at your wheel sets. Decide if those are
the wheels you intend to use on that piece of equipment. If
not, change them to what you want. Since wheels differ in
size (don’t ask me how I know this), installing couplers and then
changing wheels later may result in the coupler being too
high or too low compared to your other equipment. This is a
good time to install metal wheels if you choose. No
pressure.
2. Look at your wheel sets. Decide if those are
the wheels you intend to use on that piece of equipment. If
not, change them to what you want. Since wheels differ in
size (don’t ask me how I know this), installing couplers and then
changing wheels later may result in the coupler being too
high or too low compared to your other equipment. This is a
good time to install metal wheels if you choose. No
pressure.
 3. Look at the trucks. Using the Kadee gauge,
check the distance between the backs of the wheels and adjust if
necessary. Whether you like the wheels you’ve got, or have
changed them, make sure they turn easily in the journals.
Clean the axle and the journals. Put a little grease in the
journals. A LITTLE! Too much grease is like fly paper!
3. Look at the trucks. Using the Kadee gauge,
check the distance between the backs of the wheels and adjust if
necessary. Whether you like the wheels you’ve got, or have
changed them, make sure they turn easily in the journals.
Clean the axle and the journals. Put a little grease in the
journals. A LITTLE! Too much grease is like fly paper!
 4. Using your sprue cutters, snip off the tongue with
the truck mounted coupler on it. I cut large notches out of
the sides of the tongue, and then bend it back and forth until it
breaks off. No need to remove the axles. Then take a
file and gently smooth the broken parts.
4. Using your sprue cutters, snip off the tongue with
the truck mounted coupler on it. I cut large notches out of
the sides of the tongue, and then bend it back and forth until it
breaks off. No need to remove the axles. Then take a
file and gently smooth the broken parts.
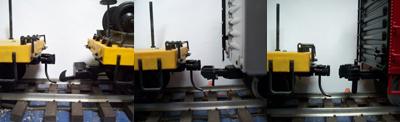
 5. Put the trucks back on the car, and with the height
gauge installed on the track, move the car onto the back (the end
opposite the coupler) of the gauge. Where the gauge hits
the car body, make a mark. This show you how much material
you’ll have to add or remove for the coupler to fit properly.
5. Put the trucks back on the car, and with the height
gauge installed on the track, move the car onto the back (the end
opposite the coupler) of the gauge. Where the gauge hits
the car body, make a mark. This show you how much material
you’ll have to add or remove for the coupler to fit properly.
 6. If there is too much space, go to do step 8.
Instead, you’ll have to build up the area with spacers until the
gauge fits easily under the shim.
6. If there is too much space, go to do step 8.
Instead, you’ll have to build up the area with spacers until the
gauge fits easily under the shim.
 7. If there is too little space you’ll have to remove
some of the car end. Using the sprue cutters, Exacto knife,
files (or more likely a combination of them) remove the material
so the lip of the coupler pocket and coupler box top fit snugly
against the cut at the proper height as dictated by the gauge.
7. If there is too little space you’ll have to remove
some of the car end. Using the sprue cutters, Exacto knife,
files (or more likely a combination of them) remove the material
so the lip of the coupler pocket and coupler box top fit snugly
against the cut at the proper height as dictated by the gauge.
 8. Now is the time to assemble the coupler, according to
Kadee’s instruction sheet. I’ve found it best to use a
knife blade to insert the coupler centering spring, and rubber
bands to hold the assembled coupler together. Don’t use glue
here, as one miscue and the coupler will not swing back and
forth,
8. Now is the time to assemble the coupler, according to
Kadee’s instruction sheet. I’ve found it best to use a
knife blade to insert the coupler centering spring, and rubber
bands to hold the assembled coupler together. Don’t use glue
here, as one miscue and the coupler will not swing back and
forth,
 9. You may notice that the coupler top doesn’t
fit parallel to the rail head. There’s nothing wrong with
that. That’s where all those little bits of plastic you’ve
been collecting for years for no known reason come to the
fore! They’ve now got a name – shims — and will
fill the space so the coupler fits properly. Shims can be
most anything, and don’t really need to be plastic. I use
plastic because that’s generally what I’ve got around, it won’t
warp and it’s not magnetic. Plastic venetian blinds are about
1/8th inch thick, and generally a good starting point.
Shims are the only item I glue together. But, I wait
several minutes before working with the shim to make sure it is
completely dry and the joint is secure.
9. You may notice that the coupler top doesn’t
fit parallel to the rail head. There’s nothing wrong with
that. That’s where all those little bits of plastic you’ve
been collecting for years for no known reason come to the
fore! They’ve now got a name – shims — and will
fill the space so the coupler fits properly. Shims can be
most anything, and don’t really need to be plastic. I use
plastic because that’s generally what I’ve got around, it won’t
warp and it’s not magnetic. Plastic venetian blinds are about
1/8th inch thick, and generally a good starting point.
Shims are the only item I glue together. But, I wait
several minutes before working with the shim to make sure it is
completely dry and the joint is secure.
 10. With a dry shim and a completed coupler, I drill
the holes in the shim for the mounting machine screws. Be
sure to slip the lip of the coupler box over the end of the
car. This means that there will be a small space beyond the
end of the shim. I drill two so the coupler won’t
pivot. It doesn’t seem to matter whether you use the two
parallel to the side of the car, or the two parallel to the end
10. With a dry shim and a completed coupler, I drill
the holes in the shim for the mounting machine screws. Be
sure to slip the lip of the coupler box over the end of the
car. This means that there will be a small space beyond the
end of the shim. I drill two so the coupler won’t
pivot. It doesn’t seem to matter whether you use the two
parallel to the side of the car, or the two parallel to the end
11. Now, place the shim on the proper location and drill those holes through the car body.
12. Place the mounting machine screws through the car body, shims, and coupler box and hold it securely with the nuts Kadee provides. On some cars, you may need longer machine screws than Kadee provides. If you drill small holes the machine screws will cut their own threads into the car body (but you’ll have to work from the bottom up). I work from the top down, and keep a supply of longer screws.
13. With the couplers installed, re-install the trucks.
14. Use the height gauge to check your work. If you need more shims, install them using the procedure outlined above.
15. Congratulations, you’ve done it! Priceless!